Creating a new Group is fast and easy through your Porter Vendor Dashboard.
- Log in to your Porter Vendor Dashboard at app.orderwithporter.com/login.
- Click on the "Create a New Group" button.

- Enter a name for your new Group.
- (OPTIONAL STEP) Enter an email address for your group if you want to receive a copy of every receipt sent to your customers as a record of sales or fulfillment management strategy.
- Select any of your locations to include in the group (if you are a vendor planning to sell as part of this group).
- Select whether you want patrons or vendors in the group to pay the 2% convenience fee.
- Select whether or not "inactive" vendors (those that are toggled off) are visible to customers.
- Select whether you want to give your customers the option to enter special instructions when ordering items.
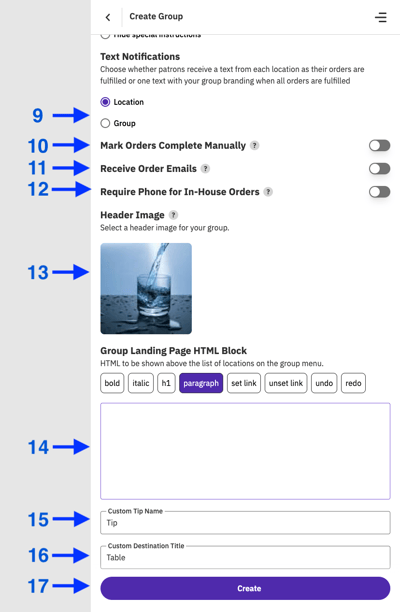
- Select whether you want customers to receive an SMS text message from each vendor involved in a multi-vendor order once each vendor marks their part of the order as "ready" in Square ("Location" choice) OR ONLY once ALL vendors involved in a multi-vendor order mark their individual parts of the order as "ready" in their Square account ("Group" choice).
- Toggle on "Mark Orders Complete Manually" if you plan to use Porter's Expeditor view to collect and fulfill multi-vendor orders and want to override all automatic texts to customers.
- Toggle on "Receive Order Emails" only if you want to receive a copy of EVERY receipt sent to all customers who order though your group. (Note that this requires the entry of an email address for the group. See Step 2 above.)
- Toggle on "Require Phone for In-House Orders" only if you want to require customers ordering for destination service to enter a phone number.
- (OPTIONAL STEP) - You can add a banner image for your new group from the available options pulled from your Square "Item Image Library."
- (OPTIONAL STEP) - You can add a message or group-level description that will appear to customers above the list of locations in your group's Porter menus. This is often helpful for advertising upcoming events or providing specific instructions to customers.
- (OPTIONAL STEP) - You can customize the name of "Tip" to whatever you like. For example, "gratuity" or "service charge."
- (OPTIONAL STEP) - You can customize the name of destination to whatever you like. For example, "Apartment" or "Cabana" or "Seat."
- Click on the purple "Create Group" button at the bottom of the screen.


Once you've created a new group, follow these instructions to invite other vendors to join your group.
